


Embroidery Made Easy: How to Turn Any Photo into a Stitchable Design
Want to embroider photos? Learn how to easily convert any image into a stitchable embroidery design with this step-by-step guide—no advanced skills needed
Introduction
Have you ever seen a stunning photograph and thought, 'This would look amazing embroidered!'? Turning photos into embroidery designs - or to convert photo to embroidery pattern - is easier than you might think, and you don't need to be a professional digitizer to do it.
Whether you want to embroider a pet portrait, a family photo, or a scenic landscape, learning how to convert photo to embroidery pattern using the right techniques can transform any image into a beautiful stitched masterpiece. In this guide, we'll walk you through the entire process, from choosing the right photo to preparing it for embroidery and successfully converting it to a stitch-ready pattern.
By the end, youll know how to:
-
Select the best photos for embroidery
-
Simplify complex images for stitching
-
Use free and paid tools to digitize your design
-
Adjust settings for the best embroidery results
Lets turn your favorite pictures into thread art!
Why Embroider Photos?
Embroidering photos adds a unique, handmade touch that printing cant match. Heres why so many crafters love it:
-
Personalized Gifts Embroidered portraits make heartfelt presents for loved ones.
-
Custom Home Decor Stitched landscapes or pet portraits add charm to pillows and wall art.
-
Small Business Potential Photo embroidery is in demand for custom apparel and keepsakes.
The key is converting your photo into a design that embroidery machines can stitch cleanly. Lets break it down step by step.
Step 1: Choosing the Right Photo
Not all photos work well for embroidery. Follow these tips to pick the best image:
? High Contrast Works Best
Photos with clear light and dark areas (like a black dog on a light background) stitch better than low-contrast images.
? Avoid Overly Busy Backgrounds
Too many details (like trees or crowds) can turn into a messy stitch. Crop or blur distractions.
? Simple Composition = Better Results
Close-up portraits or single-subject images (like a flower or a face) embroider more cleanly than wide-angle shots.
? High Resolution Matters
A blurry or pixelated photo will lead to a fuzzy embroidery design. Use the clearest image possible.
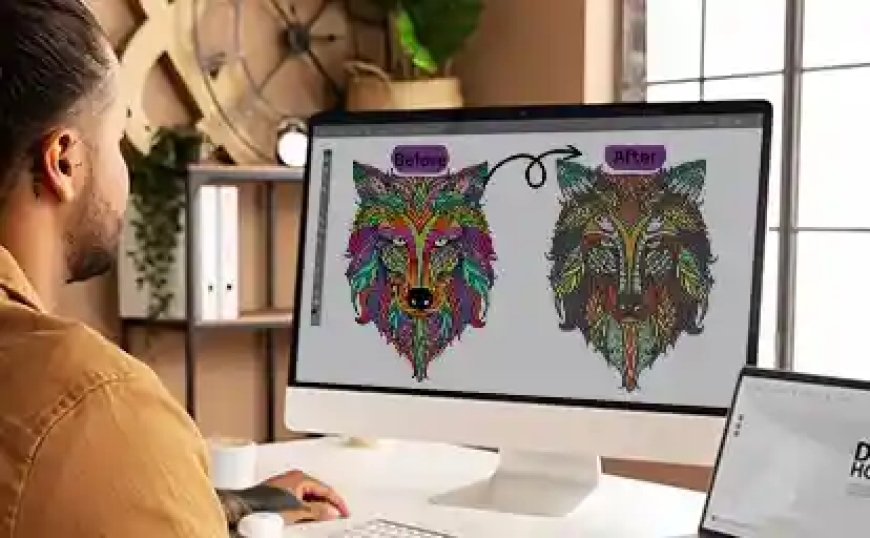
Step 2: Simplifying Your Image for Embroidery
Embroidery uses stitches, not pixels, so youll need to simplify your photo before digitizing. Heres how:
1. Convert to Black & White (For Stitch Clarity)
Grayscale helps you see which areas will translate well into stitches. Use photo editing software (like Photoshop or free tools like GIMP) to adjust contrast.
2. Reduce Details
-
For Faces:Focus on key features (eyes, lips, outline) rather than every shadow.
-
For Landscapes:Simplify trees, water, and skies into basic shapes.
3. Trace Key Lines (Optional)
If youre comfortable with design software, tracing major outlines can help define stitching paths.
Step 3: Digitizing Your Photo for Embroidery
Now comes the technical partturning your image into an embroidery file. You have two options:
Option 1: Use Auto-Digitizing Software
Some programs can convert images into stitch files automatically (with mixed results). Popular options:
-
Free:Ink/Stitch (for Inkscape)
-
Paid:Embrilliance, Hatch Embroidery
Pros:Fast, no manual work.
Cons:May need cleanup for best results.
Option 2: Manual Digitizing (Best for Quality)
For professional-looking embroidery, manually digitizing gives you full control. Steps:
-
Import your imageinto digitizing software (like Wilcom or Brother PE-Design).
-
Outline key areaswith stitch paths.
-
Assign stitch types(satin for edges, fill for large areas).
-
Adjust stitch densityto prevent puckering.
Pros:Highest quality.
Cons:Requires practice or hiring a digitizer.
Step 4: Testing and Adjusting Your Design
Before stitching on your final fabric, always test!
? Stitch on Scrap Fabric First
Check for:
-
Thread breaks(adjust tension if needed).
-
Puckering(reduce stitch density).
-
Missing details(add more stitches if necessary).
? Make Small Tweaks
-
Too bulky?Simplify stitch layers.
-
Blurry edges?Increase underlay stitches.
Step 5: Embroidering Your Final Piece
Once your design is perfected, its time to stitch!
Fabric Choices:
-
Stable fabrics(like cotton or denim) work best.
-
Avoid stretchy materialsunless stabilized properly.
Stabilizer Is a Must
Use cut-away stabilizer for dense designs and tear-away for lighter ones.
Thread Selection:
-
Polyester threadis durable and colorfast.
-
Match colorsto your original photos tones.
Common Mistakes (And How to Fix Them)
Even experienced embroiderers run into issues. Heres how to avoid them:
? Too Many Stitches = Stiff Fabric
Fix:Reduce stitch density or resize the design.
? Thread Breaks Frequently
Fix:Check tension, use quality thread, and slow down the machine.
? Design Looks Nothing Like the Photo
Fix:Simplify further or hire a professional digitizer.
Alternative: Hiring a Digitizer
If DIY digitizing feels overwhelming, outsourcing is a great option. Professional digitizers can:
-
Turn complex photos into clean embroidery files.
-
Optimize stitch paths for smooth results.
-
Save you time and frustration.
Cost:Typically $10$50 per design, depending on complexity.
Conclusion
Turning photos into embroidery designs is a fun way to create personalized, one-of-a-kind pieces. While it takes some practice, the right techniquesand a little patiencecan help you stitch stunning portraits, landscapes, and custom artwork.
Recap of Key Steps:
-
Pick a high-contrast, simple photo.
-
Simplify the image for stitching.
-
Digitize using software or hire a pro.
-
Test and adjust before final stitching.
Ready to try it? Grab your favorite photo, follow these steps, and start stitching! With each attempt, youll get closer to mastering the art of photo embroidery.