


How to Spot Issues in Your Constant Wattage Heating Cable System
Learn simple ways to detect damage early in your Constant Wattage Heating Cable system and avoid costly repairs with expert maintenance tips.
Keeping aConstant Wattage Heating Cable system running prevents ice dams on roofs, frozen pipes in walls, and cold spots on floors. Routine checks ease the mind and lower repair costs by catching small glitches at a nascent stage. In this way, there will be no need for an emergency call if there is properly planned preventative maintenance by the maintenance crew. The steps below guide through simple inspections, tests, and upkeep routines. Every team member gains confidence in safe operation and reliable heat performance.
How the Constant Wattage Heating Cable Works
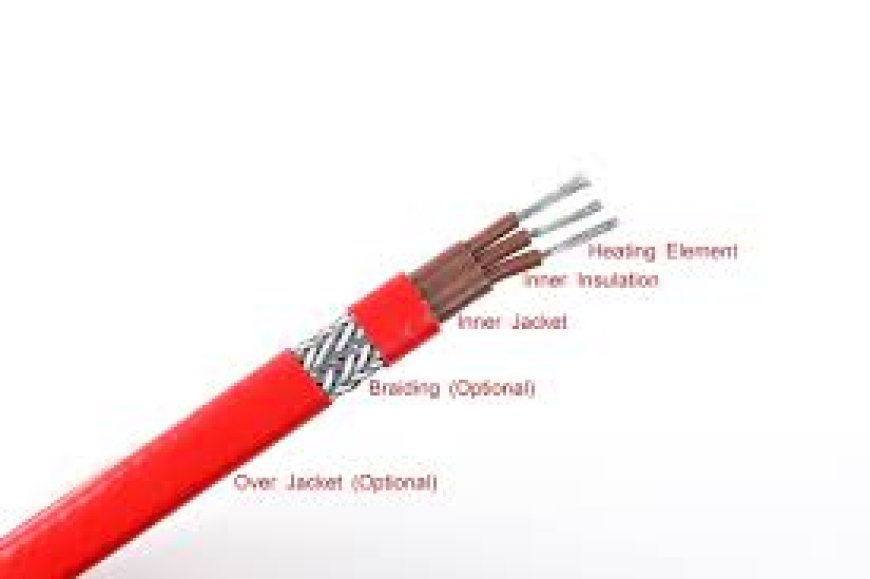
A Constant Wattage Heating Cable delivers uniform heat along its length. Electric power that enters the conductors of the cable is transformed into heat at a resistive core. The cable is strapped over metal pipes or clipped to the eaves by the installers. The flowing water keeps it where it should be and prevents the formation of ice.
Appropriate power supply ratings are matched to the output of the cable with the help of clear markings at every length of the cable. A good installation is the beginning of easy maintenance and a long life.
Why Regular Check-Ups Are Important
Routine checks keep small issues from becoming big problems. Teams find slashes and old spots before water gets in. Early fixes stop short circuits, heat loss, and risks of fire. Since seasonal temperature changes put extra stress on wires, bi-annual inspections would be best during the spring and fall. Regular care also keeps power consumption in line. Workers who stick to a timetable cut downtime and add life to the wire at once.
Inspection Timing by Season
Seasonal checks would show harm from the cold and ice. Pre-winter inspections are ready systems for the first freeze. A stressor for the cable jacket and attachments with the arrival of each season. UV damage from the summer sun outside, wetness from the fall rain hikes up in the gutters. Wear pattern is not overlooked if checks are planned around the changes of the season. A calendar reminder helps the crews stay on track and not fall off on common holiday or storm-day surprises.
Safety Gear Checklist
Safety takes top priority during any cable inspection. Protective tools keep personnel out of harms way when working near electricity and cold surfaces.
-
Insulated gloves protect hands from shock and frostbite
-
Safety glasses guard eyes during electrical tests and debris cleanup
-
Hard hat stands ready for roof or attic work
-
Non-slip shoes prevent falls on icy or wet surfaces
-
Hearing protection comes into play when using power tools
Proper gear boosts confidence and cuts accident risk. Teams should inspect each item before heading out and replace worn or damaged parts.
Tools to Gather
Effective inspections depend on having the right instruments ready at hand. Each tool provides specific insights into the Constant Wattage Heating Cable's health and operating condition.
-
Digital multimeter for checking voltage, current, and resistance
-
Insulation resistance tester to spot small leaks or jacket faults
-
An infrared thermometer or a heat gun to map temperature patterns
-
Flashlight with focused beam for detailed visual scans
-
Non-contact voltage detector for safe live-circuit checks
Visual Inspection Steps
Power is switched off while the cables cool down before they are touched. A bright flashlight along each run lights up cuts, gouges, or melted spots on the jacket. Hands are moved cautiously to trace stiff or brittle sections that seem ready to crack at any flexing.
Inspect all clips and adhesives for signs of loosening, chemical attack, or browning. Pay close attention to the crease angle and turns where cables are wound around supports. Sharp turns will nip the cables at their inner wires and cause faults to develop, but they are not easily detected.
Some Electrical Tests You Can Try Out
Live tests confirmed that the cable still conforms to the designed specifications and is operating safely. Always use insulated gloves together with safety glasses when performing these checks. Measure the supply voltage and compare it to the rated voltage of the cable.
Switch the multimeter to ohms mode to take a reading of the resistance of the conductor. Values beyond the limits set by the manufacturer indicate possible damage or loose connections. Moisture within the jacket will sometimes manifest as low insulation readings. Using an insulation resistance tester applies a safe voltage and measures leakage. Aim to record each result, comparing them later on over time to trace gradual wear.
Checking Heat Output
Uneven freeze protection due to uneven heat along the cable or cold spots that freeze pipes may be created by the ice buildup itself. An infrared camera is quite helpful in reading temperature variances on site in one gulp. In its absence, the work may also be done with a heat gun. Keep monitoring the surface temperature on the cable, and then suddenly jerk the device if there are any sharp dips or spikes picked up there, which point to damaged sections or faulty joints.
Finally, confirm if the thermostat and controller cut in and out at the right temperatures. Controls that are mis-calibrated either waste energy in the case of those preventing freezing point, or ndo ot work at all or protect vulnerable areas. Re-calibrate according to cable specs for uniform warm-up.
Wear Spots You Should Watch Out For
Certain sections of the cable are subjected to more stress and tend to wear out more quickly than the others. Roof edges suffer from UV rays and ice dam movement, while pipes in crawl spaces are subjected to rodents that nibble at the insulation. Metal clips could rust and act as knives, cutting into the cable jacket at attachment points.
Chemical cleaners and oil dripping slowly deteriorate the adhesives as well as the outer sheath. Monitoring such hot spots arrests the damage before it spreads. So, replace the corroded clips, change tapes that cover up worn cables, and reroute cables so they do not meet on common pest paths, which will stop recurring faults.
Protective Measures That Pay Off
Investments in protection lengthen maintenance cycles and lower repair bills. The teams avoid sharp edges and abrasive materials that may come into contact with the cable runs. They guard the heating cable jacket at high-traffic locations with split-loom tubing. UV-resistant ties and clips protect it from sun damage in outdoor sections.
-
Apply silicone grease or weatherproof sealant at every cable entry point
-
Install metal or plastic conduit where pets or wildlife roam
-
Follow the manufacturers minimum bend radius to avoid pinched wires
-
Use corrosion-resistant hardware in damp or coastal environments
-
Check and tighten all fasteners before the first freeze
Consistent protection keeps the cable jacket intact and prevents small nicks from becoming major failures.
When to Replace Parts
Some faults need more than quick patches. If the insulation resistance stays low after drying and repairs, that cable section needs to be swapped. Brittle or crumbling jacket material shows that the cable reached its life limit. Faulty thermostat probes and damaged controllers also call for replacement. Keep spare terminations, controllers, and short cable lengths on hand. Swapping out worn segments quickly brings the system back to full service without lengthy downtime.
Team Training and Coordination
Train crews to spot early warnings faster than one person can see a failure. Learn through hands-on classes on what theyre looking at, how to use tools, and safety measures. Have them rotate so each one gets a turn testing with both a multimeter and an insulation tester. Use situation drills for simulating ice dam hazards and loss of power. Keep open channels for easy testing data, repair action, and this part needs to reach planners. These can get set on a schedule to keep skills fresh, enforce best practices, and continue team-building.
Keeping Logs for Tracking Trends
Logs can show problems long before they cause shutdowns. Have a digital form with fields for ID, location, date, visual notes, readings, and actions. Label each cable with its code run in or on the building. Teams updating logs on site can make sure there are no more lost papers or missed entries. Reviewing the logs quarterly shows where resistance is declining slowly, hot spots are repeated, and clutch points of pressure. This type of maintenance drives better decisions, boosts system reliability, and saves on emergency repair costs when cold weather hits.
Balancing Costs and Benefits of Regular Maintenance
Issues found in the early days cost less to put right than a burst pipe, a melting ice dam, or fire damage. Simple checks take a couple of hours with two to three staff members. Normally, just some short sections of cables, new clips, and fresh sealant are used in repairs. In contrast, burst piping can shut the whole operation down for days.
And when it does, having people come out right away also costs premium rates for emergency service calls. But time invested in checking and having the right protective gear results in lower repair bills, smoother-running machinery, and a safer working environment.
When It's Time to Call a Pro
Even the most well-trained teams will face complex electrical or structural issues. If the persistent circuit breaker trips after the cable is replaced, then there must be deeper wiring faults. In terminations, if there is smoke or arcing, then there is a major fire risk, and it must be resolved by a licensed electrician.
Controller failures that recur despite proper calibration should highlight problems at the power distribution panel. In such situations, reach out to a certified professional who, with their expertise, will uncover hidden faults, ensure code compliance, and restore system trust without guesswork.