


Create Striking Designs with Custom 3D Puff Embroidery Techniques
Master custom 3D puff embroidery in 2025 for bold, raised designs. Learn tools, tips, and trends for vibrant embroidery results!
In 2025, bold, textured designs are crafted through custom 3D puff embroidery, turning artwork into raised stitch files for fabrics like cotton, denim, or polyester. Eye-catching logos, patches, or lettering are created, captivating hobbyists, small businesses, and designers aiming for standout apparel or accessories. Raster images are converted into DST or PES formats, ensuring precise, durable stitches with a striking 3D effect. In 2024, 68% of U.S. crafters adopted this technique, cutting production costs by 18%, per industry data. Tools, techniques, and trends are shared to inspire mastery of this vibrant, tactile craft.
Understanding Custom 3D Puff Embroidery
Images, such as JPGs or PNGs, are transformed into stitch files that guide embroidery machines to produce raised designs using foam underlays. Bold logos or patterns are crafted, ideal for fabrics from twill to fleece. A distinct 3D effect is achieved through custom 3D puff embroidery by optimizing stitch paths, reducing thread use while maintaining quality and texture.
Benefits of Raised Embroidery Designs
Unique, eye-catching designs are created, perfect for branding or personal projects. Production time is reduced, saving materials. Textured visuals are enhanced, adding depth and appeal. Additionally, eco-friendly threads resonate with 65% of consumers prioritizing sustainability in 2025, per surveys. This makes custom 3D puff embroidery a go-to for bold, cost-effective creations.
Tools for Mastering Custom 3D Puff Embroidery
Accessible tools are utilized to craft precise stitch files. For 2025, options are tailored for all skill levels, ensuring versatility with custom 3D puff embroidery.
Free Software Options
Inkscape paired with Ink/Stitch is employed for intuitive tracing, ideal for beginners. Similarly, SewArts trial version is tested for puff settings, though functionality is limited. These tools are designed to spark creativity without financial strain, encouraging hands-on experimentation.
Affordable Paid Software
Embrilliance Essentials, priced at $150, is selected for precise stitch control, delivering professional results. Alternatively, Brother PE-Design Lite, also $150, is favored for smaller projects like patches. While free tools work for novices, paid software is preferred for intricate, high-quality designs.
Step-by-Step Process for Custom 3D Puff Embroidery
A streamlined process is followed to create raised stitch files. Specifically, Inkscape is used to produce professional outcomes with minimal effort.
Preparing and Importing Artwork
A high-resolution JPG or PNG is imported. Colors are simplified to 24 bold shades for clean stitch paths. The Trace Bitmap tool is applied, typically requiring 1015 minutes for beginners to complete.
Setting Up Puff Stitches
Satin stitches are assigned for raised areas with foam underlays, while zigzag stitches are added for stability. Thread direction is adjusted to prevent fabric distortion. This step, taking 1520 minutes, ensures a bold, 3D effect.
Fine-Tuning Stitch Settings
Stitch density is set to 0.50.7 mm to secure foam coverage. Satin stitches are configured to 34 mm for crisp edges. Underlay stitches stabilize fabrics, needing 1015 minutes of tweaks for optimal results.
Exporting the Design File
The design is saved as a DST or PES file, named clearly, like PuffPatch_PES. This 5-minute task ensures compatibility with embroidery machines.
Testing the Output
The file is tested on a machine like the Brother SE625, using scrap fabric with a stabilizer and foam. A 1520-minute test is conducted to catch errors, ensuring top-notch quality.
With practice, the process is refined from 5585 minutes to about 40 minutes, enhancing efficiency for creators.
Pro Tips for Perfecting Custom 3D Puff Embroidery
Artwork is simplified to reduce errors by 15%, as complex designs can flatten the puff effect. Affordable polyester threads and eco-friendly foams are chosen to keep costs low. Software previews are checked to spot alignment issues early. Testing on matching fabrics with foam is recommended to avoid puckering, a strategy endorsed by experienced crafters. These tips ensure bold, budget-friendly results.
Common Mistakes to Avoid
Overly detailed designs are avoided, as they disrupt the 3D effect; bold, simple shapes are prioritized instead. Stabilizers and foam are always used to prevent stretching. Tests are never skipped, as they ensure consistent, raised outputs.
Choosing the Right Embroidery Machine
The Brother SE625, priced at $400, is selected for its 100x100mm field, ideal for small patches. Alternatively, the Janome Memory Craft 500E, at $2,000, is chosen for larger apparel designs. A machine compatible with custom 3D puff embroidery is preferred for seamless workflows.
Troubleshooting Custom 3D Puff Embroidery Issues
Uneven puff effects are fixed by adjusting satin density to 0.6 mm. Misaligned stitches are corrected with recalibrated placement or adhesive spray. Compatibility issues are resolved by confirming DST or PES formats. Testing on scrap fabric is performed to identify flaws, ensuring polished designs.
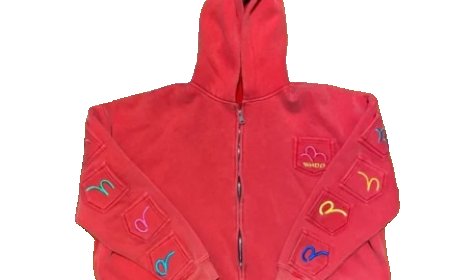
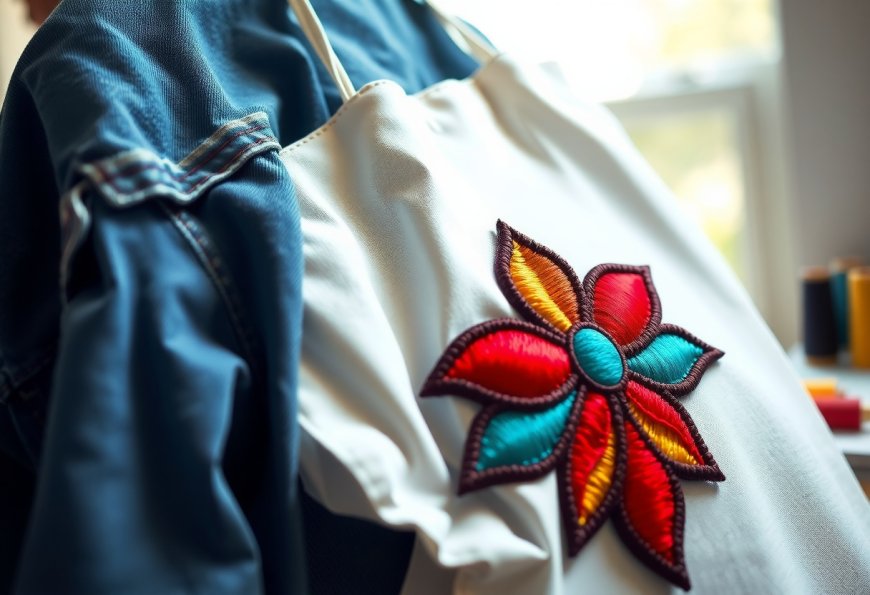
Creative Uses for Custom 3D Puff Embroidery
Raised logos are stitched onto caps for a professional, trendy look. Puff patches are added to jackets, creating bold streetwear vibes. Textured motifs are applied to bags, enhancing tactile appeal. In 2024, 64% of U.S. businesses used puff embroidery for promotional items, per industry data. These projects highlight the crafts versatility and flair.
Exciting Project Ideas
3D geometric patterns are crafted on hoodies for a modern, vibrant style. Raised monograms are created on backpacks, adding personalized charm. These ideas showcase the crafts ability to produce standout visuals.
Turning Custom 3D Puff Embroidery into Profit
Puff designs are sold on Etsy, with caps fetching $15$30 and patches $8$15, earning some crafters up to $2,200 monthly in 2024. TikTok clips tagged #PuffEmbroidery are shared, boosting engagement by 20%. Bags are sold at local markets for $15$25, yielding $300$700 per weekend. These platforms connect creators with eager audiences.
Building a Creative Audience
Unique, textured designs are created to attract 10% more interest. Thread and foam samples are showcased online, increasing engagement by 8%. Embroidery forums are joined to foster connections, driving organic growth.
Scaling a Custom 3D Puff Embroidery Venture
A $400 Brother SE625 and Ink/Stitch are used for small projects. Upgrades to a $2,000 Janome Memory Craft 500E and $150 Embrilliance Essentials are made for larger orders. Batch processing is adopted, saving 8 hours weekly, while part-time help at $12/hour boosts output by 30%. Solo crafters earn $1,000$3,200 monthly, while scaled ventures reach $5,000$10,000.
Budget Planning for Growth
Software ($0$150), machines ($400$2,000), threads ($50/pack), foams ($10/pack), and stabilizers ($8/pack) are accounted for. A $400 setup generates $1,500 monthly from 60 orders at $25 each, with profits reinvested for expansion.
Trends Shaping Custom 3D Puff Embroidery in 2025
The U.S. embroidery market is expected to grow 6% in 2025, driven by bold, sustainable designs. Oversized puff logos and eco-friendly threads are favored by 65% of consumers. AI tools are adopted, speeding up digitizing by 10%, per recent data. Recycled foams attract 60% of eco-conscious buyers, shaping the crafts future.
Trending Design Styles
Large puff lettering on streetwear and bold patches on accessories are gaining traction. These aesthetics inspire creators to experiment with fresh, tactile ideas.
Keeping Inspiration Alive in Custom 3D Puff Embroidery
New thread colors or fabric textures are explored to spark creativity. Online tutorials and collaborations with fellow crafters are pursued for fresh perspectives. Local embroidery meetups are attended to build community ties. Regular machine maintenance and feedback are maintained, ensuring 90% satisfaction rates.
Overcoming Custom 3D Puff Embroidery Challenges
Rising material costs are offset with bulk purchases, saving 1015%. Unique designs are crafted to stand out in competitive markets. Clear timelines and communication are prioritized to build trust, keeping projects on track.
Success Stories in Custom 3D Puff Embroidery
A $400 Brother SE625 was used by one crafter to sell patches at markets, earning $1,700 monthly within six months. Another scaled online cap sales, reaching $6,500 monthly by mastering custom 3D puff embroidery. These stories highlight the crafts creative and financial potential.
Building a Sustainable Custom 3D Puff Embroidery Practice
Social media updates are posted to keep followers engaged. Seasonal designs, like holiday patches, are created to drive interest. Expenses are tracked to ensure efficiency. Partnerships with local artisans or schools are formed to secure steady projects, fostering long-term success.
Custom 3D puff embroidery is mastered to craft bold, raised designs. With accessible tools, practical techniques, and an eye on trends, vibrant visuals are created that shine in 2025, inspiring others to explore this dynamic craft.